Raspberry Pi
1.1M views | +9 today
 
Scooped by F. Thunus
onto Raspberry Pi
Scoop.it!

Banana Pi BPI-R2 Pro smart router board with Rockchip RK3568 chip design - Banana Pi BPI-R2/BPI-R2 Pro/BPI-R64 - banana pi single board computer open source project official forum SinoVoip BPI team

Banana Pi BPI-R2 Pro smart router board with Rockchip RK3568 chip design - Banana Pi BPI-R2/BPI-R2 Pro/BPI-R64 - banana pi single board computer open source project official forum SinoVoip BPI team | Raspberry Pi | Scoop.it
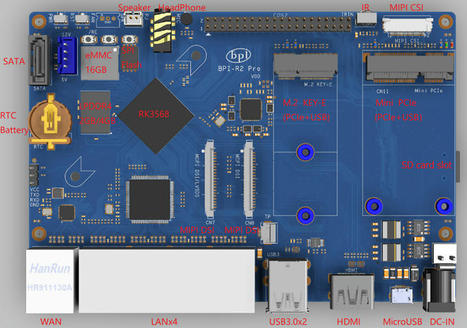
Banana Pi BPI-R2 Pro is the next generation smart router developement board from Banana Pi in 2021.It is powered by Rockchip RK 3568 processor.Onboard 2GB LPDDR4 memory and 16GB eMMC storage, and supports 2 USB 3.0 inte…...
No comment yet.
Raspberry Pi
A complete ARM GNU/Linux computer for $25.
(also covering Arduino and BeagleBone)
Curated by F. Thunus
Your new post is loading...

Popular Tags

Scooped by F. Thunus
Scoop.it!

Dear reader,

Dear reader, | Raspberry Pi | Scoop.it

The Raspberry Pi project website is http://www.raspberrypi.org/

This is one of my news digests. If you like my editorial choices, there are more to be found by clicking on the "dear reader" link, and on my name above.
Enjoy !

Donald Thomas's curator insight, August 30, 2014 8:07 AM

this is 

Wuzea Recherche's comment, March 15, 2015 6:45 AM
Propose de rechercher une ressource en tapant un mot clé dans le champ de recherche. Wuzea : http://www.wuzea.com
Vasu10's curator insight, June 9, 2021 1:49 AM
Takeoff projects help students complete their academic projects. Register at takeoff projects today to find and learn about different interesting big data projects and grab the best jobs. Get started right now.
Scooped by F. Thunus
Scoop.it!

Make DIY Arduino Bluetooth Controlled Car with Different LED Patterns

Hello Guys in this Video Tutorial I am going to show you How to Make DIY Arduino Bluetooth Controlled Car with Different LED Patterns
JLCPCB 1-6 layer PCB assembly for free, get $60 new user couponhttps://jlcpcb.com/?from=MakeDIYR


Subscribe It's Free https://www.youtube.com/channel/UCOlsZhMnW6cV11CxUAEmDiA?sub_confirmation=1

If you want to buy from me directly then Whatsapp me [India Only] : +91 93329 12239
If you need any help you can contact :)
I will be happy to help you

Arduino Code for Bluetooth Controlled Car with Different LED Patterns: [Coming in 2 Days]
Bluetooth Control App: [Coming in 2 days]
Detailed instruction guide is in process.

Note: You must detach Bluetooth Module before uploading the code to the Arduino.

Things Needed to Make DIY Bluetooth Controlled Car with Different LED Patterns Arduino UNO, L293D Motor Driver, HC-05:

Amazon.in Links:
Arduino UNO: https://amzn.to/31sEgU4
TT Gear Motor: https://amzn.to/2FLFeTF
65MM Wheels for TT Motors: https://amzn.to/31rrghv
HC-05: https://amzn.to/37G9fzQ
18650 Battery: https://amzn.to/34hsldt
2S, 18650 Battery Holder: https://amzn.to/2TdA1XY
L293D Motor Driver: https://amzn.to/3dRU9s6
Switch: https://amzn.to/3dSMREx
Jumper Wire: https://amzn.to/2HqWHBb
Soldering Iron: https://amzn.to/2HldvtF
Glue Gun: https://amzn.to/3mcr51m

Amazon US Links:
Arduino UNO R3: https://amzn.to/2SuROJC
TT Gear Motor: https://amzn.to/3nf4l29
Wheels: https://amzn.to/30zkFRI
HC-05 Bluetooth Module: https://amzn.to/36w2DU5
18650 Battery Holder: https://amzn.to/34nOVA6
18650 Battery: https://amzn.to/36EeUWu
L293D Motor Driver: https://amzn.to/3ng7Xks
Switch: https://amzn.to/3ivaUdw
Jumper Wires: https://amzn.to/3izMFe2

Banggood Links:
Arduino UNO R3: http://bit.ly/2FZY6dT
TT Gear Motor: https://bit.ly/2Mlb35E
Wheels: https://bit.ly/2U10QPM
HC-05 Bluetooth Module: http://bit.ly/2ukQvod
18650 Battery Holder: https://bit.ly/2MkPYrW
18650 Battery: https://bit.ly/3eBNH7N
L298N Motor Driver: https://bit.ly/3gB8Ws6
L293D Motor Driver: https://bit.ly/2CHPqdT
Switch: https://bit.ly/3ds4Xfy
Jumper Wires: https://bit.ly/2MjLy4t


Thank you so much for watching the video. Please hit the like button it really motivates me a lot. And also don’t forget to subscribe for more amazing Arduino-related content.

Do you have any queries about the Arduino Project? Then do let me know about that in the comment section.

#DIYProject #ArduinoProject #BluetoothCar #L293D
No comment yet.
Scooped by F. Thunus
Scoop.it!

Understanding Ultrasonic Sensors: SONAR Principles & Proximity Alarm

In this Make Mechatronics tutorial, we explore the principles and applications of ultrasonic sensors, commonly known as SONAR. Learn about the working principle of ultrasonics and how they are used in proximity detection. Follow our step-by-step demonstration as we interface an ultrasonic sensor with Arduino in TinkerCAD. Witness how we incorporate RGB LEDs and a buzzer to create a proximity alarm system. Gain practical insights into utilizing ultrasonic sensors for distance measurement and proximity detection in your mechatronics projects.

#UltrasonicSensor #SONAR #ProximityAlarm #Arduino #TinkerCAD #Mechatronics #ElectronicsTutorial #TechEducation #DIYElectronics #MakeMechatronics #STEM
No comment yet.
Scooped by F. Thunus
Scoop.it!

Talking Tomato Plant #piday #raspberrypi @Raspberry_Pi « Adafruit Industries – Makers, hackers, artists, designers and engineers!

Talking Tomato Plant #piday #raspberrypi @Raspberry_Pi « Adafruit Industries – Makers, hackers, artists, designers and engineers! | Raspberry Pi | Scoop.it
Tom’s Hardware shares how Audrey III utilizes Raspberry Pi and AI to tell you how its growing.Using a Raspberry Pi to monitor plant-related metrics is nothing new, we’ve even configure…...
No comment yet.
Scooped by F. Thunus
Scoop.it!

Smart Home DIY: Raspberry Pi Pico W Soldering and Breadboard Connection for Automated Plant Care

Soldering a Raspberry Pi Pico W for Smart Home DeviceIn this video, we will walk through the process of soldering a Raspberry Pi Pico W and connecting it to a breadboard as part of our smart home device series.

Tinkercad Circuit Diagram
https://www.tinkercad.com/things/f8LdZOVov5z-simple-solenoid-valve-switch

#diy #raspberrypi #smarthome #technology #iot
No comment yet.
Scooped by F. Thunus
Scoop.it!

Raspberry Pi based door Locking System

Welcome to our channel! In this video, we're excited to showcase a live demo of our innovative Raspberry Pi-based door locking system. 🚪🔒

Watch as we demonstrate how this smart system works seamlessly to enhance your home security. See the technology in action and get inspired to build your own!

🔹 Highlights:

Real-time operation of the door locking system
Overview of key features and components
Live demonstration of unlocking and locking mechanisms
Don't forget to like, comment, and subscribe for more tech demos and project ideas! Hit the bell icon to stay updated with our latest videos. Let's make your home smarter together! 🌟
*Made with Clipchamp*
No comment yet.
Scooped by F. Thunus
Scoop.it!

RaspberryPi ZERO No OS/CircuitPython HDMI+CLock+PhotoFrame #trending #circuitpython

RaspberryPi ZERO No OS/CircuitPython HDMI+CLock+PhotoFrame
#trending #circuitpython
#diy #circuitpython
"This video demonstrates how to create a clock using a Raspberry Pi Zero connected to an HDMI display, running CircuitPython without an operating system (No OS).

Final Result:

A clock that displays the time on an HDMI screen using the Raspberry Pi Zero and CircuitPython.

Advantages of using CircuitPython:

No need for a full-fledged operating system, making it easy and quick to use."

#raspberrypi #raspberrypicomputemodule #raspberrypi4 #circuitpython #microcontroller #micropython #diytutorial #diyprojects #diygadgets #diyideas #diy #projects #programming #programmer #st7789 #st7735 #python #innovation #invetions #internetofthings #ideas #tech #technologies
No comment yet.
Scooped by F. Thunus
Scoop.it!

IoT Project using ESP RainMaker with Google Assistant Alexa & Manual Switch- ESP32 Projects #arduino

IoT Project using ESP RainMaker with Google Assistant Alexa & Manual Switch- ESP32 Projects #arduinoproject #esp32 #iotprojects #homeautomation
In this ESP32 project, I have shown you how to make IoT Project using ESP RainMaker with Google Assistant Alexa to control relays with voice commands and manual switches. I have used all the free tools for this IoT-based home automation system.

Required Components for the internet of things project.
1. ESP32 Devkit V1 or ESP8266 NodeMCU.
2. 2-channel 5V SPDT Relay Module.
4. Wire

Amazon India Affiliate links:
Esp8266: https://amzn.to/3UxjPQA
Esp32: https://amzn.to/4by0qWz
2-channel 5V Relay Module: https://amzn.to/4bh8KdF
4-channel 5V Relay Module: https://amzn.to/44WDzlD
8-channel 5V Relay Module: https://amzn.to/3QK6HGR

FOLLOW ME ON:
Facebook:- https://www.facebook.com/profile.php?id=61552038682077&mibextid=ZbWKwL
WhatsApp:- https://whatsapp.com/channel/0029Va534jyJUM2gfHlrNr3z
Telegram Channel:- https://t.me/DIYTechKnowledge


electronics project,arduino,arduino projects,easy projects,electronics,edison science corner,Home Automation,HOME Automation,Home Automation using Telegram,Home Automation using Telegram and Nodemcu,Nodemcu,Esp8266,Esp8266 Home Automation,Simple,Easy,How to make,How to make home automation,Application,Telegram bot automation,
Best automation,
Simple home automation,
Arduino automation,
Homemade,
Diy home automation,
Best projects,
Simple projects,
Wifi automation
No comment yet.
Scooped by F. Thunus
Scoop.it!

RFID Access Control with Arduino: Full Tutorial #diy#arduino

RFID Access Control with Arduino: Full Tutorial#diy
#arduino #techinnovation #science


Welcome to my Arduino RFID access control system tutorial! In this video, I will guide you through the process of building a simple yet effective RFID-based security system using an Arduino, RFID reader, and an LCD display. This project allows you to display custom messages for authorized users and control LEDs based on access permissions


Code Download link::::
https://drive.google.com/file/d/1eC_gIJTlMeXRMudRWiY_mRPvKN9WWf0-/view?usp=drivesdk


Video:::
https://youtu.be/XY249aL5kiE?si=ctLkb-JQFmMw_ufm


Video::::
https://youtu.be/dg7uddcTQTA?si=XFYwOwJp74IPReYO


Components Needed:

✓Arduino Uno
✓MFRC522 RFID reader
✓RFID tags
✓I2C LCD display (16x2)
✓LEDs (Green and Red)
✓ResistorsBreadboard
✓jumper wires


Project Overview:When an RFID tag is scanned, the system checks if the tag is authorized. If the tag is authorized, the LCD displays "TechTwistRaj" based on the tag, and the green LED lights up. If the tag is not authorized, the LCD displays "Access Denied" and the red LED lights up. The system includes a delay to prevent rapid scanning and ensures clear feedback for each scan


arduino tutorial | arduino | arduino rfid tutorial | access control | tutorial | rfid access control | how to make door lock with arduino | arduino project | arduino rfid door lock | arduino rfid project | arduino rfid reader | rfid with arduino nano tutorial | arduino rfid | arduino rfid rc522 | rfid door lock access control system | rfid interfacing with arduino | rfid based door access control using arduino | arduino uno | rfid based access control system using arduino

#diy #creativetech #diytech #technology #techtutorial #science #arduino#tech #creativetech #diytech #scienceexperiment
No comment yet.
Scooped by F. Thunus
Scoop.it!

Identifying Wild Animals and Sending SMS Alerts Using a Raspberry Pi

#WildlifeMonitoring #RaspberryPi #SMSAlerts #AnimalDetection #IoT #ConservationTechnology #DIYProjects #WildlifeProtection #SmartSensors #EnvironmentalConservation #CommunityScience #Innovation #TechForGood #WildlifeSafety #DIYConservation #WildlifeTracking #SmartAlertSystem #IoTProjects #RaspberryPiProjects #DIYTech

For this project-related requirement, please get in touch with our executives @ +91- 9176990090 (24/7 Whatsapp Support)


To see more videos, do "like," "subscribe," and "support" our channel.
Naren Projects
No comment yet.
Scooped by F. Thunus
Scoop.it!

IoT Based Water Leakage Monitor in Blynk | IoT Projects | Water Leakage detection #iot #project

This video is about Making IoT based Water leakage Monitor System Projects. Its monitor the water flow rate in the pipe ,if the the water flow rate is different compare to input the leakage will be formed the live data will sent to blynk2.0.
Program code and circuit Link : https://drive.google.com/drive/folders/1FespEjiEOookehbOGyuDjYO5VQMSxoA1?usp=sharing
Follow on Instagram : https://www.instagram.com/research_tamil_an?igsh=MWdpaGtpNW1ybnlidw==

#electronic #trending #project #tech #technology #embedded #embeddedprojects #iot #science #iotprojects #inventions #waterleakage #blynk #creativity #creator #arduino #esp32 #esp32project
No comment yet.
Scooped by F. Thunus
Scoop.it!

Arduino UNO Temperature and Humidity sensor project with dht11 and 16x2 lcd display wirhout i2c

Code Link: https://drive.google.com/file/d/1z8UPSbqSdh1rudWRFcl9ibLyYBQ6ADLd/view? #Arduino
#ArduinoProjects
#ArduinoTutorial
#ArduinoUno
#ArduinoNano
#ArduinoMega
#microcontroller
#electronicscreators
#Coding
#programming
#maker
#makersgonnamake
#robotics
#diyelectronics
#electronicsprojects
#stem
#engineering
#iot
#opensource
#techprojects
No comment yet.
Scooped by F. Thunus
Scoop.it!

NetBurner SOMRT1061 - A stamp-sized dual Ethernet SoM powered by NXP's i.MX RT1061 crossover processor - CNX Software

NetBurner SOMRT1061 - A stamp-sized dual Ethernet SoM powered by NXP's i.MX RT1061 crossover processor - CNX Software | Raspberry Pi | Scoop.it
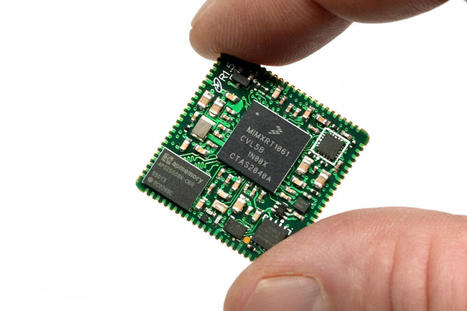
The NetBurner SOMRT1061 is an NXP i.MX RT1061 System-on-Module in an ultra-compact stamp-sized footprint (25.4 x 25.4mm) with dual Ethernet.
No comment yet.
Scooped by F. Thunus
Scoop.it!

OpenRadioss on a Raspberry Pi

I have successfully built and run OpenRadioss on a Raspberry Pi 5 (an ARM Cortex A76 processor).
This video shows how to install the development environment to create OpenRadioss binaries.
Then I run a simple crash simulation model and post-process the OpenRadioss results.
All necessary links, for the needed software, are shown in this video.

I installed Raspberry Pi OS (Debian 12, ARM porting for Raspberry Pi)

For postprocessing, I'm using ParaView.
To get ParaView to run you need to set an additional unviroment variable:
LIBGL_ALWAYS_SOFTWARE=true

For more details, please visit:
www.openradioss.org
and
https://github.com/OpenRadioss/OpenRadioss/blob/main/HOWTO.md

Have fun trying it out :-)
No comment yet.
Scooped by F. Thunus
Scoop.it!

How to make a Radar with Arduino || Arduino projects #arduino #arduinocode #iot #electroniccircuits

link for code👇👇 https://www.youtube.com/redirect?event=video_description&redir_token=QUFFLUhqbEF0VXF6UU5QMFl2UkZiQmVoeThCNWh6Ukh4QXxBQ3Jtc0tsMHFMRExxaWJZY3NDeC1kd2QyYVdiSTM3bFVTNmhHVEk3akdLQlExSFNuSHF0b2RveWl5YlN1QmpLLThHSVRTRTI5dWVrWE9JeEc1dnk0Rk5iWlZOdlhmUUVpVkNlRmJuSkNVWE1vRi1uM2Z4OFFVOA&q=https%3A%2F%2Fdrive.google.com%2Fdrive%2Ffolders%2F0BwsV1jJYW9dnenRYYXRneUtLcnM%3Fresourcekey%3D0-axsBFCosolW_5i1X1cXRVw%26usp%3Dsharing&v=JvmIutmQd9U


#innovation
#coding
#programming
#hardware
#software
#iot
#robotics
#ai
#futuretech
#gadgets
#experiment
#newtech
#electronicslife
#circuit
#prototype
#arduinoclone
#arduinoshield
#arduinocode
#arduinocommunity
#arduinoatmega
#arduinosketch
#arduinoprojects
#arduinoeducation
#arduinohome
#arduinoiot
#arduinomaker
#arduinohack
#electroniccomponents
#electronicsengineering
#electronicproject
#electroniccircuits
#electronicsrepair
#electronicstutorial
#electronicsdiy
#electronicshobby
#electronicsschematics
#electronicsdesign
#arduinoesp8266
#arduinoethernet
#arduinoled
#arduinodistancemeter
#arduinotemperature
#arduinolightsensor
#arduinobuzzer
#arduinojoystick
#arduinoirremote
#arduinomotor
No comment yet.
Scooped by F. Thunus
Scoop.it!

Home Automation Coding: Data Collection & Validation

In this Make Mechatronics tutorial, we delve into the coding phase of our Home Automation project. Learn how to collect data simultaneously from various types of digital and analog sensors, including soil moisture sensors, LDRs, and temperature sensors. Follow our step-by-step guide as we write code to display all the collected data in the Serial Monitor. Witness how we validate the data to ensure its accuracy and completeness. Gain practical insights into coding for data collection and validation in your home automation projects.

#HomeAutomation #DataCollection #DataValidation #Arduino #SerialMonitor #Mechatronics #ElectronicsTutorial #TechEducation #DIYElectronics #MakeMechatronics #STEM
No comment yet.
Scooped by F. Thunus
Scoop.it!

Simulation of Fire Alarm with Arduino using TinkerCad (IoT Application)

Inside the video:
1. Introduction (0:00)
2. Components used (0:38)
3. Connections explanation (2:16)
4. Code explanation (3:25)
5. Simulation (6:15)

In this educational video, we explore the application of IoT in fire alarm systems using Arduino and TinkerCad. This simulation demonstrates the integration of temperature and gas sensors to detect potential fire hazards in real-time scenarios.

🔥 Key Features:

1.Arduino Simulation: Learn how to simulate Arduino circuits in TinkerCad.
2. Sensor Integration: Understand the role of temperature and gas sensors in fire detection.
3. IoT Application: Explore how IoT technology enhances fire safety measures.

By:
Name: Akshay K
USN: 1BI20CS016
College: Bangalore Institute Of Technology

Thank You!!
No comment yet.
Scooped by F. Thunus
Scoop.it!

Beginner’s Guide to Arduino: Join Our Free 5-Part Workshop – Tog Hackerspace

Are you fascinated by electronics and eager to dive into the world of microcontrollers? Look no further! Tog Hackerspace, in collaboration with Dublin City Council, is excited to announce a free, five-part Arduino class specifically designed for beginners. Led by experienced makers Jeffrey Roe and Ambrose Clarke, this project-based learning series will provide you with the foundational skills to bring your creative ideas to life. Workshop Details Dates & Times: Tuesday, 11th June: 19:00 – 20:30 Thursday, 13th June: 19:00 – 20:30 Tuesday, 18th June: 19:00 – 20:30 Thursday, 20th June: 19:00 – 20:30 Tuesday, 25th June: 19:00 – 20:30 Location: Tog Hackerspace Requirements: Just bring your laptop with a USB Type A port and install the Arduino IDE ! All hardware will be provided. Sponsors: Community Grant Scheme from Dublin City Council Cost: Free, but registration is required. Registration: https://www.eventbrite.ie/e/beginners-guide-to-arduino-join-our-free-5-part-workshop-tickets-911117405687 Important Note To gain the most from this workshop, participants must be available for every session. Each class builds on the previous one, and missing a session could hinder your ability to keep up with the course content. Learn by Doing This Arduino class adopts a hands-on, project-based learning approach, ensuring that you not only understand the theory but also gain practical experience. Each session builds on the last, guiding you through increasingly complex projects that solidify your understanding and skills. Expert Guidance With Jeffrey Roe and Ambrose Clarke at the helm, you’ll be learning from seasoned professionals who are passionate about electronics and teaching. Their combined expertise will provide you with the insights and support you need to confidently navigate your Arduino journey. Community and Collaboration Tog Hackerspace is renowned for its vibrant community of makers, tinkerers, and tech enthusiasts. By participating in this workshop, you’ll become part of this dynamic group, fostering connections, collaborations, and friendships that extend beyond the class. How to Register Spaces are limited, so be sure to sign up early to secure your spot. Registration is simple and can be done via the following link https://www.eventbrite.ie/e/beginners-guide-to-arduino-join-our-free-5-part-workshop-tickets-911117405687 Conclusion Whether you’re an absolute beginner or someone with a bit of experience looking to deepen your knowledge, this free Arduino workshop is the perfect opportunity to immerse yourself in the world of microcontrollers. Sponsored by the Community Grant Scheme from Dublin City Council, this initiative underscores the commitment to fostering technological skills and innovation within the community. Don’t miss out on this chance to learn, create, and innovate! We look forward to seeing you at Tog Hackerspace this June. Let’s start making! This class is made possible by the Informal Adult Education Grant from Dublin City Council.
No comment yet.
Scooped by F. Thunus
Scoop.it!

AWS IoT: How to Connect Your Devices to the Cloud

AWS IoT: How to Connect Your Devices to the Cloud | Raspberry Pi | Scoop.it
AWS IoT: How to Connect Your Devices to the Cloud - Tripoto...
No comment yet.
Scooped by F. Thunus
Scoop.it!

How to Give a 1960s Clock Radio a Pi Makeover « Adafruit Industries – Makers, hackers, artists, designers and engineers!

How to Give a 1960s Clock Radio a Pi Makeover « Adafruit Industries – Makers, hackers, artists, designers and engineers! | Raspberry Pi | Scoop.it
Alan Boris came across this vintage radio and gave it a serious update!Check out the write up over on Hackster.io: To pay an homage to the original clock, I scanned in its face before removing it,…...
No comment yet.
Scooped by F. Thunus
Scoop.it!

How to create Traffic Light in Arduino UNO | O level IOT Computer course

How to create Traffic Light in Arduino UNO | O level IOT Computer course


o level computer course in hindi,o level course,o level,o level m4 r5,nielit o level,o level m4 r5 classes,o level m4 r5 full video playlist,o level full course,o level full course in hindi,o level m4 r5 free pdf notes download,o level iot course,o level online course,o level course in hindi,iot o level,o level new syllabus,o level iot online course,internet of things o level full course,doeacc o level,o level iot class,o level iot notes


#olevelcomputercourse
#olevelpythonprectical
#olevelcopletecourse
#bestcomputercoursekyahai
No comment yet.
Scooped by F. Thunus
Scoop.it!

Flutter Embedded Raspberry Pi UART Tutorial Part 2

This is part 2 of the Flutter Embedded UART tutorial series.
In this tutorial, we will cover how to install and set up Putty on a Linux computer (Ubuntu desktop).
Then we will do a loop-back test before testing serial data communications between the systems. All of this work is to prepare for the development of our Flutter Embedded app that will use serial communications to transfer data bi-directionally between the Pi and a computer.
Time Line
00:00 to 01:49 Introduction
01:50 to 04:13 Install Putty, set up for the test, fix font bug, and double-check settings.
04:14 to 05:53 Set up and perform a loopback test of the UART serial data using Putty.
05:54 to 06:28 Set up and connect the TTL to USB converter cable.
06:29 to 07:35 Set up and send data from the Pi to the Linux computer (Ubuntu desktop).
07:36 to 08:19 Set up and send data from the Linux computer to the Pi.
08:20 to 08:38 Conclude and requests for like and subscribe.

Equipment List:
TTL to USB Convertor with USB cable: https://amzn.to/3R11pXw
Hook up wire kit: https://amzn.to/3wZJGJ3
Development System:
Raspberry Pi mode 4B 8G RAM: https://amzn.to/3VYGNTc
Heatsink with fan: https://amzn.to/43WDf5E
Power supply: https://amzn.to/4aR9SUt
Micro HDMI to HDMI cable: https://amzn.to/3VUO46b
microSD Card: https://amzn.to/3UedHxI
Wired keyboard and mouse: https://amzn.to/3VTHyNf
Monitor of your choice.
Optional:
X862 V2.0 M.2 NGFF SATA SSD Storage Expansion Board UASP Supported Compatible with
Raspberry Pi 4 Model B: https://amzn.to/44eNRx7
Silicon Power 256GB A55 M.2 SSD: https://amzn.to/3Q3lmfQ
No comment yet.
Scooped by F. Thunus
Scoop.it!

Raspberry Pi: How to enable SSH

Raspberry Pi: How to enable SSH | Raspberry Pi | Scoop.it
If you need to access your Raspberry PI projects without using a monitor, you can set up a Secure Shell (SSH) on your computer.
No comment yet.
Scooped by F. Thunus
Scoop.it!

ArmSoM SIGE7 SBC Giveaway - Winner announced!

ArmSoM SIGE7 SBC Giveaway - Winner announced! | Raspberry Pi | Scoop.it
The ArmSoM Sige7 is a compact single-board computer (SBC) with an octa-core 64-bit SoC with a 6TOPS NPU for AI tasks.
No comment yet.
Scooped by F. Thunus
Scoop.it!

Unleash Your Arduino Projects with the 2.2 Inch TFT LCD Display Module Touch Screen Shield +

Link to purchase goods on aliexpress: https://24tch.com/?shop=6931
Buy and Review 2.2 Inch TFT LCD Display Module Touch Screen Shield + ATmega328P Board Kit with USB cable TF Card / Pen Compatible for Arduino on Aliexpress Shop
Aliexpress link:
https://24tch.com/?shop=6931 - 2.2 Inch TFT LCD Display Module Touch Screen Shield + ATmega328P Board Kit with USB cable TF Card / Pen Compatible for Arduino


Explore the incredible 2.2 Inch TFT LCD Display Module Touch Screen Shield + ATmega328P Board Kit with this must-watch video! This game-changing kit is perfect for anyone looking to take their Arduino projects to the next level. With a 2.2-inch touch screen, I2C temperature sensor, and compatibility with a variety of additional modules, the possibilities are truly endless. Whether you're a seasoned Arduino pro or just getting started, this kit is a must-have for anyone interested in creating digital photo frames, oscilloscopes, function generators, and more. Don't miss out on this incredible technology - check out the link in the description to purchase your kit today. Thanks for tuning in, and happy tinkering!
No comment yet.
Scooped by F. Thunus
Scoop.it!

SparkFun M7E Hecto RFID Reader - A Simultaneous RFID Reader with USB-C Interface

SparkFun M7E Hecto RFID Reader - A Simultaneous RFID Reader with USB-C Interface | Raspberry Pi | Scoop.it
The SparkFun M7E Hecto RFID Reader is a high-performance RFID reader for reading UHF RFID tags. The...
No comment yet.